What Is ATP? The Molecule Behind Younger-Looking Skin
Read more
FEATURED IN: The Skincare Tools Is Now Available At Niche Beauty
Read more
FEATURED IN: The Skincare Tools Launches At KaDeWe Berlin
Read more
Laser Face Mask Before & Afters: Why Dermatologists Are Calling This The Best Laser Face Mask
Read more
Skin Longevity: The Longevity Routine For Your Face
Read more
From NAD+ To Light Therapy: How Longevity Science Is Changing The Way We Age
Read more
AS SEEN IN VOGUE: The Facial Sculpting Tool Built on Real Skin Science
Read more
5 Reasons Dermatologists Recommend The Skincare Tools LED Face Mask for Younger-Looking Skin
Read more
Collagen Through The Decades: How Your Skin Changes In Your 20s, 30s, 40s, 50s And Beyond
Read more
86% Reported Firmer-Looking Skin In 6 Weeks: What Our Clinical Trial Revealed About Laser Light Therapy
Read more
Laser vs LED Masks: What's The Difference?
Read more
Your Scalp May Be Aging Up To 6x Faster Than Your Face. Here's What That Means For Your Hair.
Read more
Sarah Stephens’ Secret for a Sculpted-Looking Face
Read more
Cryotherapy for Skin: The Science of Cooling Therapy, Skin Recovery + Modern Facial Sculpting
Read more
“If Your Face Looks Puffy, It’s Not Fat… It’s Fluid” - Lowri Webb, Sydney Aesthetician
Read more
5 Reasons Dermatologists Recommend the 4D Pro Ultimate LED Face Mask
Read more
What Is A Microcurrent Facial Device? The Complete Guide to Anti-Aging, Lifting, and Radiance
Read more
Elastin vs Collagen: The Secret to Firmness, Elasticity, and Bounce
Read more
What Is Lymphatic Drainage? A Modern Guide to Sculpted, De-Puffed Skin
Read more
FEATURED IN: The Skincare Tools is officially launching in 11 Erewhon stores across the United States.
Read more
FEATURED IN: ELLE Australia Bridal Skincare Secrets: How Isobel Larkin Achieved Her Wedding Day Glow
Read more
THE 11 VERY BEST ICE TOOLS: For De-Puffing Your Face
Read more
EDITORS FAVOURITE: The Skincare Tools Cyro/Thermo Recovery Mask
Read more
LED Light Therapy: The Science-Backed Skincare Essential
Read more
5 Professional Skincare Tools That Will Transform Your Daily Routine
Read more
The Art of Curating Your Skincare Tool Wardrobe
Read more
FEATURED IN: MARIE CLAIRE THE A TO Z OF SKIN X THE CRYO/THERMO MASK
Read more
EVENTS: COACHELLA : UTOPIA X THE SKINCARE TOOLS
Read more
NATASHA TCHORNOBRYVKO: INSIDER SECRETS FROM A CELEBRITY SKIN GURU
Read moreNo files found for this tag.
Meet the Expert Panel

Plastic Surgeon
DR JEREMY HUNT
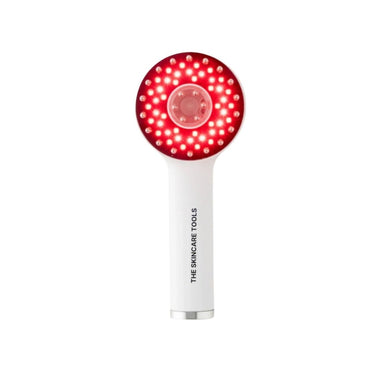
"Laser light therapy can be used at home to reduce the appearance of fine lines and wrinkles, this is the latest innovation in antiageing skincare technology”

Longevity Pharmacist
IBRAHIM AZAM
“From a longevity perspective, cryotherapy helps reduce inflammation, support circulation, and maintain resilient skin over time. Used consistently, it’s a powerful tool for long-term skin health.”

ENT Specialist and Cosmetic Surgeon
DR MICHAEL ZACHARIA
“At-home LED therapy is an important part of post-procedure care. Used consistently, it can help minimise scarring, calm inflammation, support healing, and improve overall recovery outcomes.”

Sydney Aesthetician
LOWRI WEBB
"There are many different tools that you can use to get a great lymphatic drainage at home, the 5-in-1 wand has all of these separate tools in one device so it is a favourite of ours."

Celebrity Facialist
NATASHA TCHORNOBRYVKO
"My favourite tool is the 5-in-1 Face Pilates Wand. The lymphatic massage setting removes toxins, decreases puffiness and boost circulation, resulting in better skin tone and a more luminous complexion. "

Celebrity Makeup Artist
TANNIA TIROPANIS
"Skin prep is everything, the 5-in-1 Face Pilates Wand is by far the best tool for lymphatic drainage that I've ever used on my clients. I also love the Cryo Glow Globes and the Laser Face Mask to awaken the skin."

Celebrity Makeup Artist
LEAH BAINES
"The best thing you can do for your makeup is have beautifully prepped skin. The Dermaglide Exfoliator, Cryo Glow Globes and 5-in-1 Face Pilates Wand are my ride or die favourites!"
EXPERT ADVICE
How To Prevent Fine Lines + Wrinkles
Dr Jeremy Hunt | Plastic Surgeon
June 14, 2026How To Remove Morning Puffiness With An At-Home Lymphatic Drainage Massage
Lowri Webb | Sydney Aesthetician
May 7, 2026The Real Reason Laser Light Therapy Is So Effective
Ibrahim Azam | Longevity Specialist
June 12, 2026The Difference Between LED and Laser Light Therapy Masks
Dr Jeremy Hunt | Plastic Surgeon
June 14, 2026Do Laser Masks Actually Work?
Ibrahim Azam | Longevity Specialist
June 12, 2026Most People Are Doing Lymphatic Drainage Wrong
Lowri Webb | Sydney Aesthetician
May 7, 2026Skin Routines
HOW TO USE
4D Pro Laser Light Therapy Face Mask
The 4D Pro Ultimate LED Face Mask
The 5-in-1 Face Pilates Wand
The Serum Activation Wand
5-in-1 Scalp Care Brush
Contour Sculptor
Pro LED Hair Growth Cap
Dermaglide Exfoliator
Cryo Glow Smoother
Cryo Glow Cube
Jade Radiance Smoother
Multi Sculpt Gua Sha
TOOLPEDIA
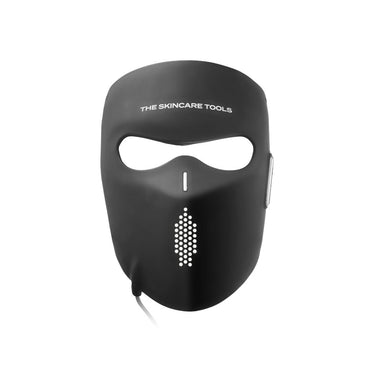
4D PRO ULTIMATE LED FACE MASK
Step 1: Prepare the Skin
Begin with freshly cleansed, dry skin. Removing surface oils and impurities allows the LED wavelengths to reach the skin more effectively and ensures optimal light exposure.
Step 2: Fit the Mask
Position the 4D Pro Ultimate LED Mask comfortably over the face. The flexible medical-grade silicone constructionand 4D contouring design adapt to the natural structure of the face, ensuring even LED contact and consistent light distribution across the skin.
Step 3: Select Your LED Mode
Power on the device and select your preferred LED mode and intensity level using the side controller.
• Radiance Mode (Red + Near-Infrared) supports skin vitality and helps maintain firmness while smoothing the appearance of fine lines.
• Purify Mode (Blue + Near-Infrared) helps support clearer-looking skin and balance the appearance of excess oil.
• Deep Support Mode (Red + Deep Red + Near-Infrared) supports skin structure, elasticity, and overall skin resilience.
• Ultimate Balance Mode (Blue + Deep Red + Near-Infrared) supports a more even-looking tone and refined texture.
Each mode combines clinically recognised wavelengths to target different skin goals in a single session.
Step 4: 10-Minute LED Session
Relax while the mask delivers even, high-coverage LED light therapy through 240 medical-grade light points. The device features a 10-minute auto-timer with voice-guided prompts, ensuring effortless and consistent treatments.
Red and near-infrared wavelengths penetrate beneath the skin’s surface to stimulate cellular energy and support the skin’s natural renewal processes.
Step 5: Continue Your Routine
After the session, remove the mask and continue your routine with your serum, moisturiser, or SPF. Skin is now optimally prepared to absorb skincare products.
Step 6: Clean the Device
Gently wipe the mask with a soft, damp cloth after use to maintain device hygiene.
Results with Consistent Use
The combination of multi-wavelength LED light therapy and full-face coverage works to support visible skin performance over time.
• Supports visible firmness and smoother-looking skin
• Helps improve clarity, tone, and overall radiance
• Encourages cellular energy and skin renewal
• Supports skin vitality and long-term skin health
With consistent use, skin appears brighter, smoother, more balanced, and visibly revitalised.
Serum Activation Wand
Step 1: Prepare and Cleanse the Skin
Begin with freshly cleansed skin. Apply a water-based serum or essence rich in ingredients such as peptides, hyaluronic acid, or antioxidants.
The Serum Activation Wand is designed to maximise the performance of the skincare you already use,
so applying serum before treatment allows the device’s technologies to
enhance absorption and support visible skin performance.
Step 2: Activate Glow Mode (Electroporation + Red LED)
Select Glow Mode, which combines electroporation technology with red LED light therapy (630nm).
Electroporation works by creating temporary microscopic pathways in the outer skin layer,
allowing active ingredients to penetrate more effectively. At the same
time, red LED light helps support circulation and the appearance of
firmness and skin vitality.
Starting at the centre of the chin,
glide the wand slowly upward along the jawline toward the ear. Continue
across the cheeks and forehead using slow lifting movements. This step
helps enhance serum absorption while supporting radiance and overall skin vitality.
Step 3: Refine with Sculpt Mode (Electroporation + Blue LED)
Switch to Sculpt Mode, which combines electroporation with blue LED light (415nm).
Blue light helps support clarity and oil balance, while electroporation continues to optimise ingredient delivery. Glide the device slowly across the cheeks, jawline, and nose area, focusing on areas where pores appear enlarged or congestion may occur.
The combination of ingredient delivery and LED therapy helps support clearer-looking skin and more refined facial contours.
Step 4: Restore Skin with Thermal Therapy (Restore Mode)
Activate Restore Mode, which combines thermal therapy with purple LED light (400-430nm).
The gentle warmth helps to:
- stimulate blood flow
- support oxygen and nutrient delivery
- soften the skin surface
- enhance the absorption of active ingredients
Glide
the wand slowly across the cheeks, temples, and forehead. The warming
sensation encourages circulation while helping the skin appear more supple, revitalised, and elastic.
Step 5: Stimulate Lymphatic Flow with Massage Mode
Select Massage Mode, which uses sonic vibration massage combined with yellow LED light (580nm).
The vibration stimulates circulation, lymphatic drainage, and nutrient exchange, while yellow LED helps support a more even-looking tone and visible redness reduction.
Begin at the centre of the face and glide outward toward the temples, then guide the wand downward along the side of the neck toward the collarbone. This movement follows the natural lymphatic pathways and helps reduce puffiness while relieving facial tension.
Step 6: Focus on Delicate Areas
Use the wand around the under-eye area, temples, and nasolabial folds with very light
pressure. Move slowly outward toward the temples to encourage lymphatic
drainage and support a brighter, more refreshed appearance.
Step 7: Complete the Lymphatic Drainage Pathway
Finish by gliding the wand down the side of the neck toward the collarbone several times.
This
step helps ensure fluid that has moved from the face is directed into
the body’s natural lymphatic drainage system, leaving the skin looking less puffy and more energised.
Step 8: Post-Treatment Care
Once the treatment is complete, gently wipe the device head with a soft cloth or alcohol wipe.
The skin should feel warm, revitalised, and hydrated, with serums fully absorbed.
Professional Technique Guidance
The Serum Activation Wand works through a combination of four advanced technologies that support skin performance when used consistently:
Electroporation Technology Creates temporary pathways in the skin to maximise serum penetration and help active ingredients absorb more effectively.
Multi-Wavelength LED Light Therapy Supports different aspects of skin health including clarity, tone, circulation, and visible firmness.
Thermal Therapy Encourages circulation, oxygen delivery, and enhanced ingredient absorption.
Sonic Vibration Massage Stimulates lymphatic drainage, reduces puffiness, and relieves facial tension.
Diamond Lifting Roller
Step 1: Prepare the Skin
Begin with clean skin and apply a serum or facial oil to allow the roller to glide smoothly without pulling the skin. The lightweight slip allows controlled rolling while supporting product absorption.
Step 2: Activate the Neck Drainage Points
Always begin at the base of the neck near the collarbone, where lymph from the face ultimately drains. Using the roller, glide downward toward the collarbone in slow, controlled movements. Repeat several passes to gently open the lymphatic pathways and prepare the face for drainage.
Step 3: Stimulate the Side Neck
Position the roller just below the ear and glide slowly down the side of the neck toward the collarbone. This movement activates the cervical lymph nodes and encourages fluid movement away from the face.
Step 4: Sculpt the Jawline
Place the roller at the centre of the chin and glide outward along the jawline toward the ear. The diamond-contoured heads allow even pressure across the facial plane while encouraging lymphatic movement and refining the appearance of the lower face.
Step 5: Lift the Cheeks
Position the roller beside the nose and glide outward across the cheek toward the temple. Repeat several slow passes to support circulation, reduce puffiness, and enhance cheek definition.
Step 6: Depuff the Eye Area
Using the lightest pressure, glide gently from the inner corner of the eye toward the temple. This helps move excess fluid away from the delicate eye area and supports a brighter, more refreshed appearance.
Step 7: Smooth the Forehead
Start at the centre of the forehead and glide outward toward the temples. Once reaching the temples, guide the roller down toward the ear and along the neck to the collarbone to complete the lymphatic pathway.
Step 8: Finish the Drainage Cycle
Return to the neck and collarbone area and repeat gentle downward strokes to ensure fluid moved from the face drains efficiently through the lymphatic system.
The diamond-contoured dual heads and naturally cooling stainless steel support precise rolling while stimulating circulation and lymphatic flow.
With consistent use, the Diamond Lifting Roller helps:
• Encourage lymphatic drainage and reduce puffiness
• Stimulate circulation and skin vitality
• Support visible lifting and contour definition
• Improve skin tone and natural radiance
When used regularly as part of a structured routine, the skin appears more sculpted, refined, and visibly energised.
Cryo Glow Globes
- Chill the Globes: Place the Glow Globes in the refrigerator for at least 10–15 minutes before use. Do not freeze.
- Prep the Skin: Begin with clean skin. Apply your favourite serum, moisturiser, or facial oil to create a smooth surface for massaging.
- Massage in Gentle Motions: Using light pressure, glide the globes over the face in upward and outward motions. Focus on areas of puffiness, such as under the eyes, cheeks, and jawline.
- Use Around the Eyes: Carefully roll under and around the eye area to reduce puffiness and refresh tired eyes. Always use gentle movements.
- Duration: Use for 2–5 minutes daily or as needed—ideal before makeup application or as part of your morning/evening ritual.
- Be consistent: for best results, use daily or as part of your regular skincare ritual.
- Clean after each use: wipe the tool with a soft cloth or cleanse with mild soap and water. Dry thoroughly and store in a cool, dry place.
Recommended Use: use 3–5 times per week, or daily for accelerated results. Safe for all skin types.
Pro Tips:
- Use over sheet masks to supercharge hydration and soothe the skin simultaneously.
- Perform after gua sha for amplified tightening and lift.
JADE RADIANCE SMOOTHER
- Prep: begin with clean skin. Apply a few drops of serum or facial oil to allow the tool to glide smoothly.
- Smooth: Begin at the centre of the face and roll outward using gentle pressure across the cheeks, jawline, and forehead. Use short, upward strokes around the eyes, nose, and brow bone to target puffiness and support microcirculation.
- Drain: Glide the roller down the sides of the neck to help flush away excess fluid and complete the drainage process.
- Repeat: each movement 3–5 times per area, always in an upward and outward direction.
- Be consistent: for best results, use daily or as part of your regular skincare ritual.
- Clean after each use: wipe the tool with a soft cloth or cleanse with mild soap and water. Dry thoroughly and store in a cool, dry place.
Recommended Use: use 3–5 times per week, or daily for accelerated results. Safe for all skin types.
Pro Tips:
- Chill before use to amplify calming and depuffing effects.
- Pair with a vitamin C serum in the morning for maximum radiance.
MULTI SCULPT GUA SHA
- Prep: start with clean skin and/or scalp. Apply your favourite serum, facial oil, or scalp treatment to allow the tool to glide smoothly.
- Scalp Stimulation: using the comb side, glide the tool gently along your scalp in upward motions to stimulate circulation and promote relaxation.
- Sculpt Contours: turn to the curved edge and sweep across the cheeks, jawline, and forehead using upward and outward strokes to sculpt and tone.
- Release Tension: use short, targeted motions around the brow bone, temples, and back of the neck to release built-up tension and increase microcirculation.
- Repeat: each movement 3–5 times per area, always in an upward and outward direction.
- Be consistent: for best results, use daily or as part of your regular skincare ritual.
- Clean after each use: wipe the tool with a soft cloth or cleanse with mild soap and water. Dry thoroughly and store in a cool, dry place.
Recommended Use: use 3–5 times per week, or daily for accelerated results. Safe for all skin types.
Pro Tips:
- Store in the fridge for amplified cooling and sculpting.
- Switch between edges during your routine - each edge targets a different muscle group for balanced lifting.
DERMAGLIDE EXFOLIATOR
- Cleanse the Skin: begin with freshly cleansed, dry skin.
- Position: hold the tool at a 45-degree angle and lightly stretch the skin with one hand.
- Glide: using the other hand, glide the blade across your face in short, downward strokes. Use gentle pressure to let the blade do the work. Focus on areas with peach fuzz or dull, uneven texture such as the cheeks, chin, and forehead.
- Avoid sensitive areas: do not use on active breakouts, irritated skin, or directly around the eyes.
- Wipe the blade between passes: use a clean, dry cloth or cotton pad to gently remove debris from the blade during your treatment.
- Follow with hydration: apply a soothing serum or moisturiser to lock in moisture and calm the skin post-treatment.
- Clean the tool: rinse the blade carefully with rubbing alcohol or warm soapy water, then dry thoroughly before storing.
Recommended use: Use once every 1–2 weeks. Replace blades every 1–2 months for optimal performance. Always read all labels and warnings before use.
Pro Tips:
- Perform dermaplaning at night — your serums will absorb deeper while your skin repairs overnight.
- Always replace the blade before a big event — fresh blades deliver the smoothest, clearest finish.
COLLAGEN-INFUSED MOUTH TAPE
- Prep lips: Make sure lips are clean, dry, and free from oils or balm before applying.
- Apply strip: Gently press the tape across the centre of your lips, ensuring full contact with the skin.
- Breathe through your nose: Allow the tape to support gentle nasal breathing as you sleep—helping improve oxygenation, hydration, and skin recovery overnight.
- Remove with care: In the morning, generously apply The Skincare Tools Lip Oil to soften the adhesive, then gently peel off the tape to avoid skin disruption.
- Finish your routine: Follow with your usual morning skincare steps for smooth, refreshed, plumped skin.
Pro Tip:
If you're new to mouth taping, begin with a few nights per week and gradually increase to nightly use for optimal results.
Contraindications:
Not suitable for children or individuals with heart conditions, nasal congestion, breathing disorders, or those who have consumed alcohol or sedatives.
DERMAGLIDE BLADE REFILLS
- Ensure the Tool Is Clean and Dry: always replace the blade on a clean, dry tool.
- Remove the Old Blade: carefully grip the blade cartridge and slide or snap it off the handle, depending on your model. Dispose of the used blade safely.
- Attach the New Blade: align the new refill cartridge with the handle and slide or snap it into place until secure.
- Check for Stability: ensure the blade is firmly attached and does not move during use.
Pro Tips:
- Replace your blade every 1–2 months or when it begins to feel dull for optimal results and hygiene.
- Store refills in a dry area to maintain sharpness
LYMPHATIC GERMANIUM SCULPTOR
- Prep: begin with clean skin. Apply a few drops of serum or facial oil to allow the tool to glide smoothly.
- Smooth Face: Using light pressure, roll upward and outward across the face focusing on the jawline, cheeks, and forehead. Use smaller motions around the eyes and mouth.
- Massage Body: move to the body. Use broader, longer strokes on areas like the neck, arms, legs, and back to relieve tension and stimulate lymphatic flow.
- Repeat: each motion 3–5 times per area.
- Be consistent: for best results, use daily or as part of your regular skincare ritual.
- Clean after each use: wipe the tool with a soft cloth or cleanse with mild soap and water. Dry thoroughly and store in a cool, dry place.
Recommended Use: use 3–5 times per week, or daily for accelerated results. Safe for all skin types.
Pro Tips:
- Use around the eyes in the morning to instantly lift and awaken tired lids.
- Combine with micro-current on alternate days for superior tightening.
Deep Hydration Booster Bio-Cellulose Facial Mask (5 PACK)
- Cleanse: Begin with freshly cleansed, dry skin.
- Unfold & Prepare: Gently remove the mask from its pouch and peel away the protective mesh layers from both sides.
- Apply: Smooth the bio-cellulose layer onto the face, aligning it with the contours of your skin.
- Relax: Leave on for 10–15 minutes to allow the ingredients to absorb deeply.
- Remove & Press In: Peel off the mask and gently press any remaining serum into the skin—no need to rinse.
- Pair with Tools: Use before, after, or during your skincare tool ritual for enhanced results. Works beautifully with LED masks, cryo tools, sculpting rollers, or facial massage.
Pro Tip: Store in the fridge and apply chilled for an ultra-calming and de-puffing effect.
ADVANCED BODY PRO LED MAT
Always read the full User Manual before using the device.
- Prepare the Skin: ensure the skin is clean and free of heavy lotions or oils to allow optimal light penetration.
- Position the Mat: place the LED mat on a flat surface bed, sofa, or treatment table. Lie down so your targeted treatment area aligns fully over the light-emitting area.
- Power On & Select Intensity: use the control panel to choose your light colour and intensity level.
- Relax & Rejuvenate: remain under the mat for 15–30 minutes depending on your skin goals. The mat is waterproof and hands-free for effortless, full-body therapy. Use glasses as needed.
- Post-Treatment: turn off the device. Skin may be followed with a hydrating body serum or left bare for natural absorption.
Recommended Use: use 3–5 times per week. Safe for daily use.
Pro Tips:
- Combine with deep diaphragmatic breathing techniques or a guided meditation while lying on the mat.
- Use within 30 minutes post-exercise to help reduce muscle fatigue and stiffness.
UPF50+ Collagen Hydration Gloves
- Apply The Skincare Tools, serum treatment for added moisture and protection.
- Slip on The Collagen Shield Gloves before your gel manicure session or prior to sun exposure.
- Wear throughout your manicure to protect the skin from UV lamp exposure or as a daily sun care step.
- After use, gently hand wash with mild soap and air dry. Reuse as often as needed.
Pro Tip: Use as an overnight hand mask The Skincare Tools balm for visibly smoother, younger-looking hands by morning.
5-IN-1 SCALP CARE BRUSH
Step 1: Prepare the Scalp
Begin with clean, dry or slightly damp hair. If using a scalp treatment, fill the built-in serum chamber with a lightweight, water-based scalp serum to support targeted delivery during the treatment.
Step 2: Activate the Device
Turn on the 5-In-1 Scalp Care Brush to activate the integrated technologies. The device combines laser therapy, multi-wave LED light, EMS microcurrent, and vibration massage to support scalp stimulation and follicle activation in one treatment.
Step 3: Glide Across the Scalp
Starting at the front hairline, gently glide the brush backward toward the crown. Continue working across the scalp in slow, controlled passes, allowing the laser and LED light system to stimulate follicles while EMS microcurrent helps energise the scalp.
Step 4: Focus on Key Areas
Spend additional time on areas where hair appears thinner or weaker, such as the crown or temples. The combination of light therapy, microcurrent, and vibration massage helps support circulation, nutrient delivery, and scalp comfort.
Step 5: Massage and Stimulate
Allow the vibration massage to work across the scalp to help relieve tension, encourage oxygen flow, and support a healthier scalp environment where stronger-looking hair can thrive.
Step 6: Enhance Serum Delivery
If using a scalp serum, the brush’s targeted infusion system helps distribute product evenly through the brush teeth, supporting deeper absorption directly at the scalp.
Results with Consistent Use
The combination of laser therapy, multi-wave LED light, EMS microcurrent, vibration massage, and serum infusion works to support a healthier scalp environment over time.
• Supports scalp health and follicle vitality
• Encourages thicker-looking, fuller hair
• Helps improve circulation and nutrient delivery
• Balances oily or congested scalps
• Enhances the absorption of scalp treatments
With consistent use, the scalp appears healthier, more balanced, and better supported for stronger, fuller-looking hair.
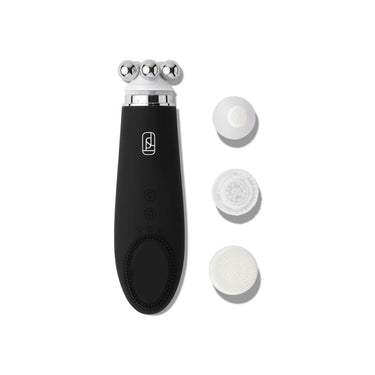
5-In-1 Pilates Face Wand
Step 1: Deep Cleanse the Skin
Begin with the Large Silicone Cleansing Head or Soft Cleansing Head and
apply your cleanser to damp skin. Use gentle circular motions across
the face, neck, and chest to lift away impurities while respecting the
skin barrier.
For more detailed areas such as the nose, chin, and T-zone, switch to the Small Precision Cleansing Head to help remove congestion and refine pores. The device’s gentle rotation and vibration support deep cleansing, improved circulation, and smoother skin texture while preparing the skin for treatment.
Step 2: Activate Circulation with Vibration
Switch to Vibration Mode to
help stimulate circulation and relax facial tension. Glide the device
slowly across the cheeks, jawline, and temples. The vibration therapy
helps reduce puffiness, energise the skin, and prepare the tissues for lymphatic movement.
Step 3: Begin Lymphatic Drainage
Attach the Pilates Lymphatic Drainage Head and apply a light serum or facial oil. Start on the lowest rotational speed to allow the lymphatic system to respond gradually.
Always begin at the base of the neck,
gliding downward toward the collarbone. This step opens the drainage
channels so fluid from the face can move efficiently through the
lymphatic system.
Step 4: Drain the Neck and Jawline
Starting below the ear, glide the device down the side of the neck toward the collarbone. Repeat several slow passes on each side.
Next, move to the jawline, placing the wand at the centre of the chin and gliding outward toward the ear. The Pilates-style rotational massage supports lifting, facial contouring, and lymphatic movement while helping reduce fluid retention.
Step 5: Sculpt the Cheeks and Mid-Face
Place the wand beside the nose and glide outward across the cheek toward the temple.
Repeat three to five times. These movements encourage lymphatic
drainage, support circulation, and help refine facial contours for a
more sculpted appearance.
Step 6: Depuff the Eye Area
Using the lightest pressure, glide the device from the inner corner of the eye toward the temple. This gentle movement helps move excess fluid away from the under-eye area, supporting a brighter, more refreshed appearance.
Step 7: Smooth the Forehead
Start at the centre of the forehead and glide outward toward the temples.
Once you reach the temples, guide the wand down toward the ear and then
down the neck toward the collarbone to complete the lymphatic pathway.
Step 8: Enhance Absorption with Thermal Therapy
Switch to the Thermal Therapy Pad and apply your serum or moisturiser. The controlled warmth helps boost circulation, support collagen activity, and enhance the absorption of skincare, allowing active ingredients to penetrate more effectively.
Step 9: Finish the Drainage Cycle
Return to the neck and collarbone area and repeat gentle downward strokes. This final step ensures fluid moved from the face is fully directed through the lymphatic system.
Professional Technique Guidance
Use slow, controlled movements and repeat each stroke three to five times. The goal is not aggressive massage but consistent stimulation that encourages circulation, supports lymphatic flow, and relieves facial tension.
With regular use, the Pilates-style rotational massage, vibration therapy, thermal therapy, and cleansing functions work together to help:
- Support facial lifting and contour definition
- Reduce puffiness and fluid retention
- Encourage lymphatic drainage and circulation
- Smooth the appearance of fine lines and wrinkles
- Improve elasticity and overall skin texture
- Enhance skincare absorption for more effective results
When used consistently as part of a structured routine, skin appears firmer, smoother, more defined, and visibly revitalised.
CONTOUR SCULPTOR
Step 1: Prepare the Skin
Apply a serum or facial oil to clean skin to allow the tool to glide smoothly.
Step 2: Activate the Neck
Begin at the base of the neck near the collarbone and glide downward to support lymphatic drainage.
Step 3: Sculpt the Jawline
Place the tool at the centre of the chin and roll outward along the jawline toward the ear to support contour definition.
Step 4: Lift the Cheeks
Glide from the side of the nose across the cheek toward the temple to encourage circulation and refine facial contours.
Step 5: Depuff the Eye Area
Using light pressure, glide from the inner eye toward the temple to help reduce puffiness.
Step 6: Smooth the Forehead
Start at the centre of the forehead and glide outward toward the temples, then guide the tool down toward the neck.
Results with Consistent Use
• Supports lymphatic drainage and reduces puffiness
• Encourages circulation and skin vitality
• Helps lift and define facial contours
• Relieves facial tension
Skin appears more sculpted, refreshed, and visibly lifted with regular use.
CRYO GLOW SMOOTHER
- Chill the Tool: store the Cryo Glow Smoother in the refrigerator or freezer depending on your preferred cooling intensity. Allow a few seconds for the surface to adjust before applying directly to skin.
- Prep the Skin: Start with clean skin. Apply your preferred serum or moisturiser to enhance glide and boost absorption.
- Treat: using gentle pressure, roll the tool in upward and outward motions across the face, neck, or body. Focus on areas prone to puffiness, redness, or tension. Continue for up to 10 minutes or as desired.
- Be consistent: for best results, use daily or as part of your regular skincare ritual.
- Clean after each use: wipe the tool with a soft cloth or cleanse with mild soap and water. Dry thoroughly and store in a cool, dry place or in the refrigerator.
Recommended Use: use 3–5 times per week, or daily for accelerated results. Safe for all skin types.
Pro Tips:
- Use after workouts to reduce inflammation and tension.
- Roll over sheet masks for boosted absorption and cooling benefits.
SCULPTURAL GUA SHA
- Prep: begin with clean skin. Apply a few drops of serum or facial oil to allow the tool to glide smoothly.
- Sculpt: Hold the tool at a shallow angle (about 15 degrees) and begin with gentle strokes along your jawline, working outward toward your ears to encourage lymphatic flow.
- Lift: glide the curved edge across the cheeks and up toward the temples using firm, slow motions to lift and sculpt.
- De-puff: use the notched and narrow curves to trace under the eyes, around the nose, and along the brow bone
- Repeat: each movement 3–5 times per area, always in an upward and outward direction.
- Detox: Finish by sweeping down the sides of the neck to flush out stagnant fluid and complete the detoxification process.
- Be consistent: for best results, use daily or as part of your regular skincare ritual.
- Clean after each use: wipe the tool with a soft cloth or cleanse with mild soap and water. Dry thoroughly and store in a cool, dry place.
Recommended Use: use 3–5 times per week, or daily for accelerated results. Safe for all skin types.
Pro Tips:
- Store in the fridge for amplified cooling and sculpting.
- Use slow strokes for lifting and sculpting, faster strokes for energising.
Precision Smoother
Step 1: Prepare the Skin
Begin with clean skin and apply a light serum or eye cream to allow the tool to glide smoothly. This supports controlled movement and enhances product absorption.
Step 2: Activate the Neck Drainage Points
Start at the base of the neck near the collarbone and glide gently downward. This step opens the lymphatic pathways so fluid from the face can drain efficiently.
Step 3: Under-Eye De-Puffing
Using the precision tip, begin at the inner corner of the eye and glide outward toward the temple with very light pressure. Repeat slow passes to help move excess fluid away from the under-eye area and reduce puffiness.
Step 4: Inner Eye + Nose Contour
Place the tip alongside the inner eye and nose contour and glide upward and outward toward the bridge of the nose and temple. This supports lymphatic movement in areas where fluid often collects.
Step 5: Brow Bone Lift
Glide the tool along the brow bone from the inner brow outward toward the temple. This helps relieve tension in the periocular area while supporting circulation and lift.
Step 6: Temple Drainage
From the temple, guide the tool down toward the ear and along the side of the neck to the collarbone to complete the lymphatic pathway.
Step 7: Repeat + Refine
Repeat each movement 3–5 times, maintaining light, controlled pressure. The naturally cooling stainless steel helps calm the skin while supporting circulation and reducing visible fatigue.
Professional Technique Guidance
The precision-engineered tip and cooling stainless steel allow targeted stimulation across delicate facial zones, supporting:
• Lymphatic drainage and reduced puffiness
• Microcirculation and skin vitality
• Release of tension in the eye and brow area
• Enhanced absorption of eye creams and serums
With consistent use, the under-eye area and delicate contours appear smoother, brighter, and visibly refreshed.
Cryo Glow Cube
- Fill the Cube: unscrew the top and fill with water or your preferred ice facial blend.
- Freeze the Cube: place in the freezer until fully frozen. Before use, allow it to sit for a few moments or briefly run under water to gently soften the surface.
- Cleanse the Skin: begin with freshly cleansed, dry skin.
- Glide the Cube: across skin on freshly cleansed skin, gently glide the in upward, circular motions. Focus on areas of puffiness or fatigue to instantly awaken and contour the complexion.
- Clean after each use: rinse the cube thoroughly, refill if desired, and return to the freezer.
Recommended Use: Use daily for 30 seconds to 1 minute. For sensitive skin, apply a protective barrier.
Pro Tips:
- Avoid using with oil-based serums, as they can create slip without delivering the same absorption benefits.
- Glide the cube slowly in outward movements, following natural lymphatic drainage routes.
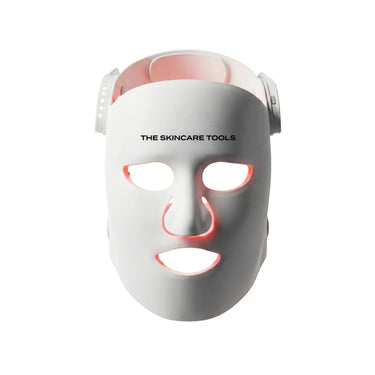
CRYO-THERMO DEPUFFING MASK
Step 1: Prepare the Skin
Begin with freshly cleansed, dry skin. For enhanced results, apply a hydrating serum, soothing essence, or barrier-support treatment to allow the skin to absorb actives more effectively during treatment.
Step 2: Choose Your Treatment Mode
Cryotherapy (Cooling Mode): Place the mask in the fridge or freezer until chilled to your preference. Ideal for morning use or post-treatment recovery to help reduce puffiness, calm redness, and support lymphatic drainage.
Thermotherapy (Warming Mode): Heat on low or medium for 10-15 seconds, ensuring the temperature does not exceed 80°C. Heat in 5-second increments if needed. Ideal for evening use to help boost circulation, relax facial tension, and enhance product absorption.
Step 3: Apply the Mask
Position the mask comfortably over the face and secure with the strap. Ensure even contact across the skin to allow consistent thermal delivery.
Step 4: Treatment Time
- Leave on for 10-20 minutes while relaxing.
- Cooling mode helps de-puff, soothe, and refine skin texture
- Warming mode helps stimulate circulation, support oxygen delivery, and optimise skincare performance
Step 5: Complete the Routine
Remove the mask and gently massage any remaining product into the skin.
PROFESSIONAL TIPS
- Use warm mode before serums or masks to enhance penetration and performance
- Use cool mode after skincare to calm the skin and help lock in benefits
- Ideal post-flight, post-treatment, or after long days to support skin recovery and balance
- Consistent use supports a smoother, more refreshed, and visibly revitalised complexion
EYE ERASER
- Prep the Skin: apply your preferred eye serum or skincare product to the under-eye area.
- Power On the Device: opress and hold the diamond-shaped button for 2 seconds until the blue light activates. This initiates the warming mode.
- Select Mode: press once to activate Thermo Therapy mode, press twice to enable Thermal + T-Sonic Pulsation mode for enhanced treatment.
- Treatment: gently glide the device under the eye for up to 3 minutes per eye. For full-face use, limit application to 10–15 minutes total.
- Turn Off: press and hold the power button for 3 seconds to power off.
- Post-Treatment Care
Wipe the device clean with a soft cloth after each use and store in a dry, safe place. - Clean After Use: Wipe the device clean with a soft, damp cloth.
Recommended Use: use 3–5 times per week, or daily for accelerated results. Safe for all skin types.
JADE THERMAL CLEANSER
For Cleansing:
- Turn On: Press and hold the power button for 3 seconds to activate the device.
- Prep the Skin: Apply your preferred facial cleanser to damp skin.
- Activate Vibrations: Press and hold the ‘M’ mode button to initiate vibration. Press again to cycle through three speed levels to suit your comfort.
- Cleanse: Glide the device in gentle, circular motions across the face. Use the finer bristles on the smaller side to reach delicate areas like the sides of the nose and upper lip.
- Turn Off & Clean: Press and hold the power button for 3 seconds to turn off. Rinse the device with water and dry thoroughly after each use.
For Thermal Massage:
- Activate Jade Heating: After powering on the device, double-click the power button. A red light will appear, indicating the jade stone is warming.
- Apply Skincare: Smooth your favourite serum or moisturiser over the face and neck.
- Massage: Gently glide the warm jade stone across the skin in upward, sweeping motions to enhance absorption, boost circulation, and relax facial tension.
- Turn Off & Clean: Press and hold the power button for 3 seconds to turn off. Rinse the device with water and dry thoroughly after each use.
Overnight Renewal Kit
Step 1: Prepare
Begin with a freshly cleansed face. Ensure the lip and mouth area is completely dry and free from skincare products to allow the Collagen-Infused Mouth Tape to adhere properly.
Step 2: Apply the Mouth Tape
Gently peel one strip from the backing and position it over the closed lips. Smooth down the edges so it sits comfortably and securely. Once applied, the strip will begin working overnight encouraging nasal breathing while infusing the skin with collagen, vitamins, and hydrating actives.
Step 3: Overnight Renewal
Leave the strip in place as you sleep. The breathable medical-grade adhesive is designed for comfort and flexibility, supporting natural movement while delivering skincare benefits throughout the night.
Step 4: Morning Removal
On waking, apply a generous layer of the Hydrate + Repair Daily Barrier Oil directly over the tape and surrounding lip area. Massage gently to soften and dissolve the adhesive. The tape will release easily without tugging or irritation.
Step 5: Post-Tape Ritual
Continue massaging the oil into the lips and surrounding skin to replenish hydration, relieve any tightness, and restore comfort. Allow the nutrient-rich blend of rosehip, seabuckthorn, marula, and vitamin E to cocoon the skin, leaving it supple, smooth, and radiant for the day ahead.
Pro Face Steamer
- Start with Clean Skin
Begin with freshly cleansed skin to ensure maximum steam penetration and effectiveness. - Fill the Water Tank
Use distilled or purified water only. Fill the water tank as directed and securely replace the cap. - Activate the Device
Press the power button and wait for the steam to begin emitting—this typically takes a few moments. - Steam Your Face
Position your face approximately 15cm away from the nozzle. Gently move your face side to side, allowing the steam to evenly reach all areas. - Duration
Use for up to 10 minutes per session. Recommended use is no more than twice daily. - Aftercare
Power off the device and follow immediately with your preferred skincare products while the skin is warm and most receptive.
FULL BODY GUA SHA
- Prep: Apply oil or balm to clean skin to allow smooth gliding.
- Body: apply firm strokes in upward or inward motions to stimulate fascia release and help visibly reduce cellulite.
- Neck and jawline: use gentle upward or outward strokes to promote sculpting and drainage.
- Scalp: Glide along the scalp in circular or combing motions to relieve tension and awaken circulation.
- Detox: Repeat each motion 3–5 times and finish with long, downward strokes from head to heart or upwards from toes to heart to guide toxins into the body’s natural elimination channels.
- Be consistent: for best results, use daily or as part of your regular skincare ritual.
- Clean after each use: wipe the roller with a soft cloth or cleanse with mild soap and water. Dry thoroughly and store in a cool, dry place.
Recommended Use: use 3–5 times per week, or daily for accelerated results. Safe for all skin types.
Pro Tips:
- Store in the fridge for amplified cooling and sculpting.
- Use after a hot shower for easier glide and deeper muscle release.
PRO LED HAIR GROWTH CAP
Step 1: Prepare the Scalp
Begin with a clean, dry scalp. Remove any heavy oils, styling products, fibres, or dry shampoo, as these can interfere with light penetration and reduce treatment effectiveness.
Step 2: Position the Cap
Place the Pro LED Hair Growth Cap comfortably on the head, ensuring full contact with the scalp. The flexible design allows you to target the entire scalp or specific areas of concern, such as the crown or hairline.
Step 3: Activate the Device
Press the power button to begin treatment and select your preferred light mode (steady or flash). The device delivers 660nm red light and 850nm near-infrared light evenly across the scalp to support follicle stimulation and circulation.
Step 4: 10–15 Minute Treatment
Relax while the cap delivers hands-free light therapy across the scalp. The lightweight, cordless design allows you to continue daily activities during the session.
Step 5: Complete the Session
After 10–15 minutes, turn off the device and store it in a cool, dry place. Recharge as needed for the next treatment.
Professional Usage Guidance
For optimal results, use the device 3–5 times per week as part of a consistent scalp care routine. Light therapy works cumulatively, supporting scalp health and follicle vitality over time.
With consistent use, the dual-wavelength red and near-infrared light system helps stimulate follicle activity, support circulation, and promote a healthier scalp environment for thicker, fuller-looking hair.
Results Studio